Wednesday, June 25, 2014

Fun Space Crafts and Activities for Kids

My 4-year old son really got into our Blast Off! Week of MOMS Camp this summer. We did a few small projects I found at the Dollar Tree, such as a space sticker scene and some foam rockets that were fun. We also made a few crafts that we all loved!

One of my favorite things we made this week was Night Sky Play Doh! My kids really love play doh - especially my son. I found this awesome recipe on Pinterest that was perfect for this week and we had a blast. Here is the original Link  for the recipe I followed.  The only thing was, I didn't have any black food coloring.... or any black liquid water color! So I came up with a fabulous idea to turn the play doh any color I wanted!! Dissolve dried watercolor paints into 1 cup of water and mix into your play doh as it's cooking! Just pop out a little oval of watercolor paint from the pallet and stir it into a cup of water. For this night sky color I used one oval of black and one oval of purple paint.  When the play doh was cooling, I added TONS of glitter in all different sizes and shapes.


We used plastic gems and glow in the dark stars to make night scenes in the play doh which was a super fun way to play with it before we really started molding and squishing the play doh like normal.  Then we used those giant glow in the dark stars to decorate my son's ceiling! They cleaned up great after being in the play doh so it wasn't a problem.


I have been dying to paint with shaving cream for some time and was excited to come up with a craft project using it for Space Week.  We made Shaving Cream Painted Planets!! Start with a rectangle cooking tray covered in foil and fill it with shaving cream.


Then squirt several lines of acrylic paint on top.  Use something pointy to swirl it around - but not too much! We used plastic chop sticks but you could just use the tip of your paint brush.... or your fingers if you're not afraid of a little mess! 


Cut out circles of construction paper and press one down onto the shaving cream mixture.  Hold it there for about 10 seconds, making sure it touches everywhere.  Then gently pull it off and set it aside to dry. 

 After about five minute, use a squeegee to carefully scrape off the access shaving cream and you're left with an awesome swirly planet!


This was such a cool technique to create what looks exactly like a gaseous planet - I loved it! Not to mention my kids loved playing in the shaving cream afterwards and mixing it up even more.

Finally, we made some Paper Straw Rockets that I found on Pinterest. They were so fun and simple - we used crayons to decorate several small squares of paper. They were each about 4.5" by 4.5". Then wrap the paper around a pencil to help it hold a cylindrical shape.


Glue it down one side to create a tube. 


Once that's dry, fold over one end and secure with tape.


Stick it over the end of a straw and blow (just like you do with a new straw wrapper at a restaurant!) to launch your rocket! We used big plastic straws for ours but regular straws are fine too. This was a fun project to make and THEN play with! Here is the original blog where I found this!


Wednesday, June 11, 2014

Fun Space Themed Recipes For Kids

Our Blast Off! week of MOMS Camp was a big hit! I was so happy that my 4-year old really got into it! Here's some of the fun space themed recipes we had this week:

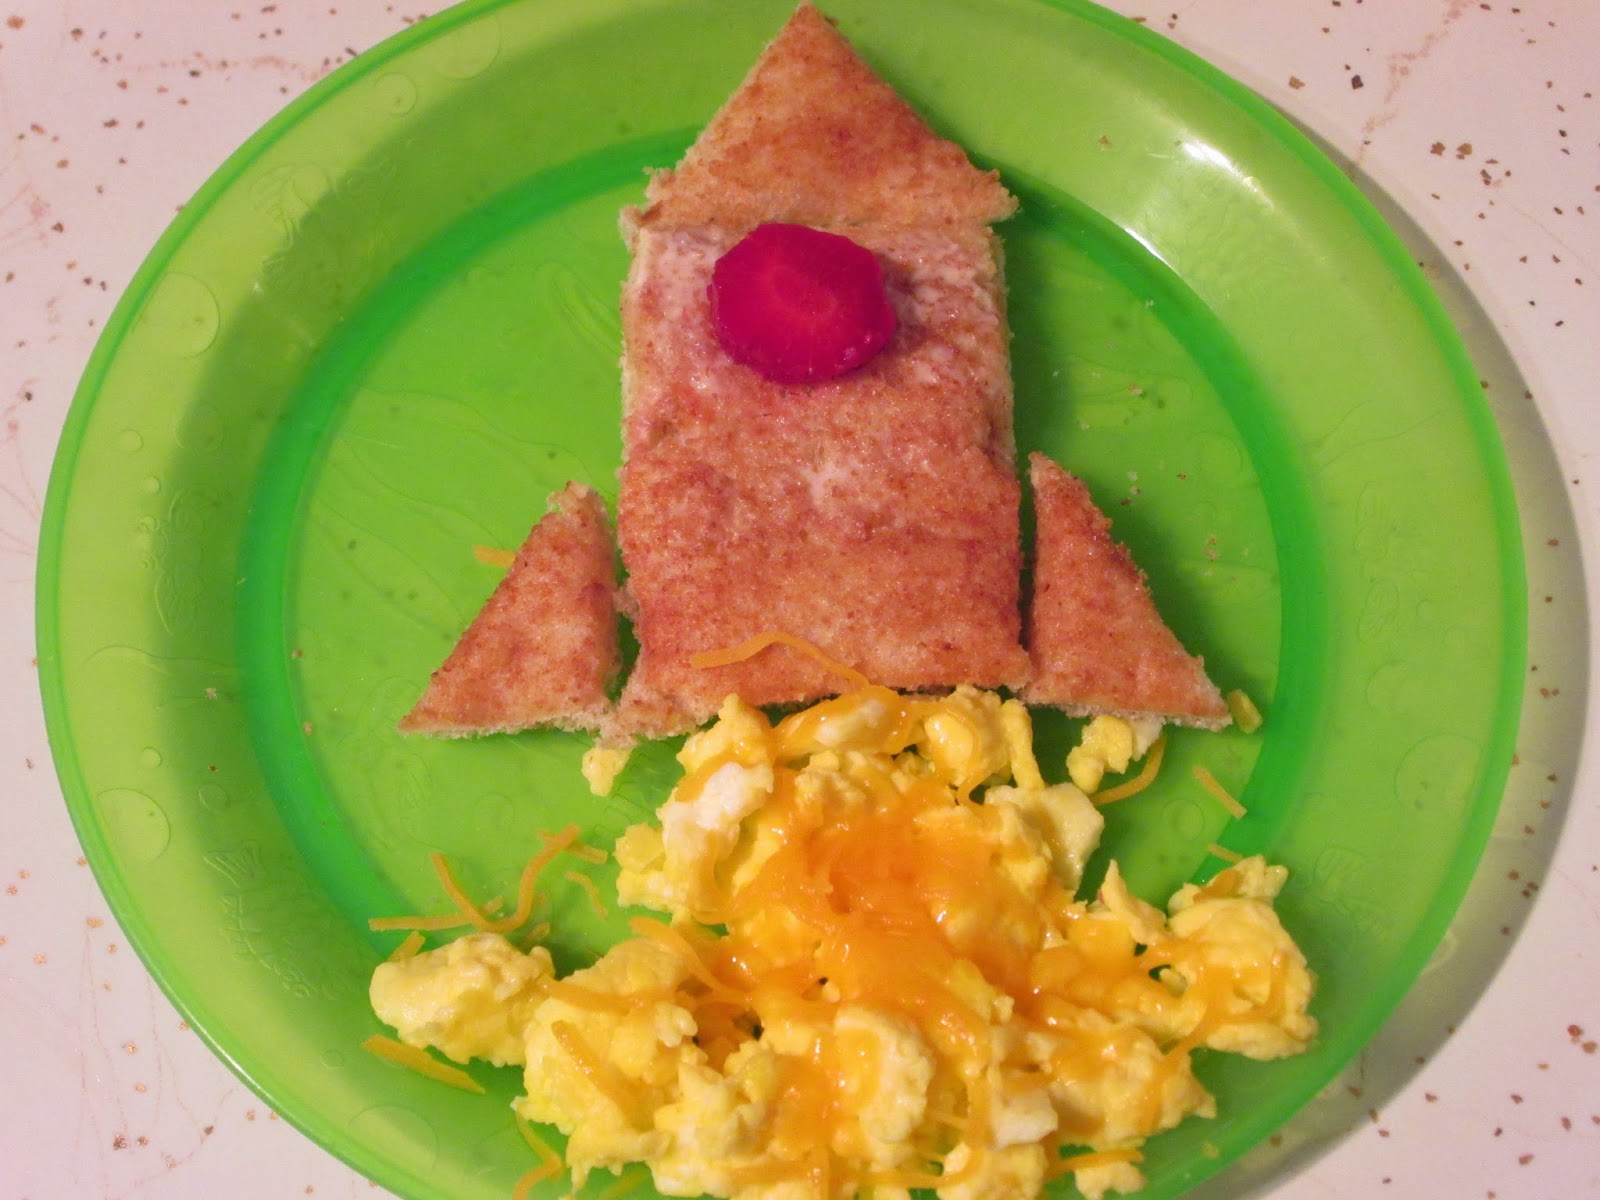
We made a fun breakfast out of toast and scrambled eggs that looked like a rocket ship! I added a bit of yellow food coloring to the eggs to make them extra bright and sprinkled some shredded cheddar cheese on them. Please note: there are no crusts on the toast! lol I also added a small window to our rocket ships using a round slice of strawberry!


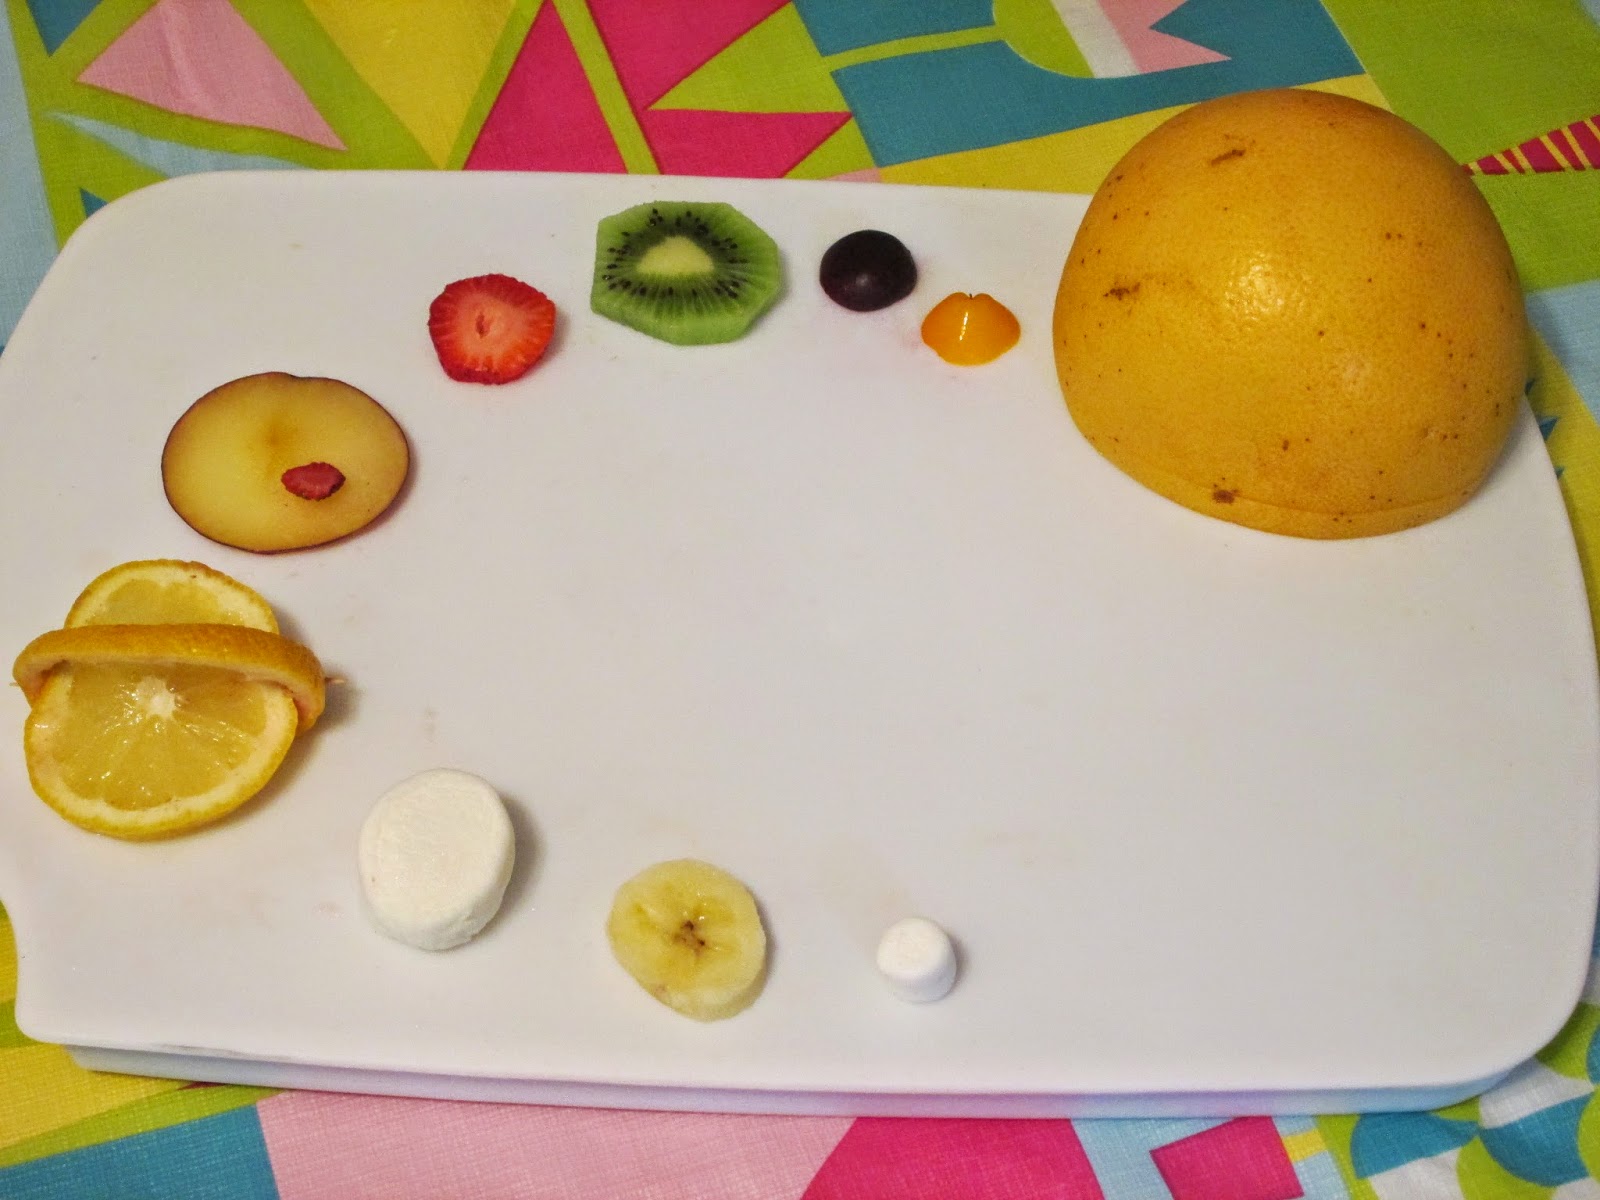
For a fun and educational snack, we shared a Fruit Tray Solar System! I found this idea on Pinterest but ended up using my own ideas for each planet, based on what  I had on hand. Here's a list of what I used to get the (relatively) right colors and sizes: Sun - grapefruit; Mercury - little yellow sweet pepper; Venus - cherry; Earth -  kiwi; Mars - strawberry; Jupiter - plum with a tiny strawberry to be the big red spot; Saturn -  lemon with an extra lemon peel for the rings; Uranus -  regular size marshmallow; Neptune - banana; Pluto - miniature marshmallow! I placed everything on my icy tray from Pampered Chef so they stayed cool...and my kids thought this snack was really "cool!"


Another very educational snack we had was a plate of Oreo cookies - portraying the Phases of the Moon!! I saw this idea on Pinterest and HAD to do it. So yummy and so smart! We also read a book about the moon and it's phases right before we had this snack. I was so proud a few nights later when my 4-year old pointed out the "half moon" in the sky! I just used a butter knife to scrape off the extra frosting we didn't need for each shape... but it was all reused in the remaining "top cookies" to create extra Oreos to eat.


A very quick and easy dessert I made one day was Night Sky Chocolate Pudding! I literally made this in a couple minutes while my kids were playing and they hardly noticed I was gone, it went so fast. This is also a great recipe your kids can make on their own! Make some instant chocolate pudding and as it is setting, sprinkle some mini marshmallows on top to be the stars. Use a sharp knife or kitchen shears to cut out a crescent shape from a regular size marshmallow to be a moon! I like making single servings ahead of time so after dinner it is so fast and easy to pull these out of the refrigerator for a yummy and special dessert.


One day this week we went to pick strawberries (not space related but fun!) so naturally I made strawberry shortcake! I did make it with a star theme to go with our space week, butt then I turned it into a red white and blue dessert so I wrote about separately for the 4th of July and you read that blog post HERE


Red White and Blue Strawberry Shortcake 4th of July Dessert!

This was the second year we went to pick strawberries and we love it! What a fun outing! Such easy fruit to pick and what a delicious prize! We were so lucky to make it out before they closed for the season - we went on the very last day!! All the strawberries we picked were super ripe and very sweet. I made two batches of strawberry shortcake because it was so popular with my family! One day, I decided to make it  a little special and created a new 4th of July dessert! We actually like to eat it for breakfast, too!


First make your shortcake. I used a baking mix and had my batter ready in minutes. As you're putting it onto the cookie sheet, press the batter through a star-shaped cookie cutter. It'll be a little poofy so you'll need to squeeze the corners to be sure it's shaped like a good star. Before you put it in the oven, sprinkle some blue sugar sprinkles on your stars. Then bake like usual.


While that's baking, you'll create the strawberry sauce. Cut up several strawberries into small, bite size pieces.  When you have about 1 1/2 cups, sprinkle them with sugar. I never measure mine, but it's probably about 1/2 a cup of sugar. Seal your strawberries in a gallon size plastic bag, or in a bowl with a lid so you can mix it up. The more you mix it,the more syrupy the strawberries will become.


Spoon some strawberry mixture onto a warm shortcake and serve with whipped cream. Delish!

Tuesday, June 3, 2014

Children's Books and DVDS With a Space Theme

The next week for our MOMS Camp is "Blast Off!" It's a week about space, rockets, planets, and the moon and stars. I'm hoping to make a trip to our city's Planetarium this week, along with an amusement park so we can go on a rocket ride! Each day we will read books and watch DVD's having to do with space.

Here's a list of some space-themed children's books to read:

The Planets by Martha E. H. Rustad
Rockets and Spaceships by Karen Wallace (beginning reader)
National Geographic Kids: Planets by Elizabeth Carney (beginning reader)
Space Shuttles by Colleen Sexton
Glow In The Dark Constellations by C.E. Thompson (This one has more print than I would normally read to my own kids, ages 4 and 7, but the glow in the dark pictures are great!)
Stars and Constellations by Nick Hunter (this one about constellations is a little more readable)
Zoom, Rocket, Zoom! by Margaret Mayo
A Trip Into Space by Lori Haskins Houran (love this rhyming book!)
Stars by Mary Lyn Ray (not what you'd expect!)
Green Wilma Frog In Space by Tedd Arnold
The Moon by Robert Louis Stevenson, pictures by Tracey Campbell Pearson
and of course, Good Night Moon by Margaret Wise Brown!


Here's a list of some space-themed DVD's to watch, listed with movies first:

Wall-E
Muppets in Space
Escape From Planet Earth
Fly Me To The Moon (this one was really cute and showed some very realistic stuff from NASA!)
Megamind
Space Buddies
Star Wars Saga
VeggieTales: Veggies in Space
Backyardigans: Mission to Mars
Tom and Jerry In Space
Cat in the Hat: Space is the Place!
Curious George: Rocket Ride and Other Adventures!


Finally, a fun CD to listen to with your kids is Rocketship Run by the Laurie Berkner Band

Fun Weather Crafts for Kids

During our Weather Week of MOMS Camp we made several fun crafts!


Part of our week was all about clouds - learning the different types and reading books about them. My personal favorite is Little Cloud by Eric Carle, in which a single cloud changes into several different shapes, like a rabbit, a shark, and a clown! After reading this book we used white paint and cotton balls to paint our own cloud shapes. Naturally my daughter made hers into a lamb! We also added lots of white paint to the middle of a sheet of construction paper, then folded it in half to make a new blob shape for a cloud.  We used my favorite paint, Crayola Washable Kids Paint.


My daughter loved painting with cotton balls so much, she came up with her own project! It started when she wanted to use her favorite color (brown) to paint with... and it turned into a tornado! Later, when the paint was dry, she added lots of stickers to portray animals and bugs that might be swept up in the tornado! This project was so much fun to do!


 Another fun project was finger painting with sun block! I squirted a little bit of sun block onto a plastic lid and we used our fingers to paint with it on black construction paper. You can use any dark color of paper. Be sure the sun block is kind of thick as you're painting. Then you leave it out in the sun for a couple hours and watch how the sun fades the paper's color all around your design! The sun block will evaporate and your design will be left on the paper in the original dark color! This is a fun way to teach your kids how sun block really does protect your skin!


At the beginning of the week, we made a homemade rain gauge! This was in idea from Pinterest. You'll need an empty plastic bottle, all washed out with the label taken off.  Cut off the top part and turn it upside down, then place it inside to keep water from evaporating out later.  I used an old steak knife to cut our bottle, and covered the rough edges with duct tape. Use a ruler to mark your measurements on one side, then you can decorate your bottle with permanent markers! We left our rain gauge outside all week, with a chance of rain every day... but it barely rained at all! My daughter (age 7) still had fun going out to check it each day though. Here's a picture of the one we saw online:


Here's ours as we made it:

Windsock Craft for Kids

Our last craft we made during our Weather Week of MOMS Camp was a wind sock - and it was definitely the most popular craft of the week! We each decorated an 8 1/2" x 11" sheet of card stock for it. My daughter and I chose to paint ours, but my son (age 4) isn't always willing to sit for such long crafts so he drew on his with marker and added stickers. 


When the paint was dry, we turned them over and taped strips of crepe paper to the bottom edge. Each strip was about 18 inches. This was great cutting practice for my preschooler! Then we rolled up the card stock and stapled it together to make a cylinder. 


I used a hole puncher to add two holes across from each other at the top. Before punching the holes, I reinforced the card stock with pieces of tape on each side where the holes would go. Finally, I tied a piece of yarn through both holes (again, about 18 inches in length). 


Now we can hang them for decoration and my kids LOVED running around with their wind sock flying out behind them!

Monday, June 2, 2014

Fun Kids Recipes - Weather Theme!

Throughout our Weather Week of MOMS Camp, we made several fun recipes including snacks, side dishes, a breakfast, and desserts!

For a new take on "sunny side up eggs" we made an easy Sunshine Breakfast! This fun and simple meal of scrambled eggs and toast is from a previous post I did in 2012. You can read more about it HERE. For my son's breakfast this time, I made his with cinnamon-sugar toast!


A fun side dish we made at lunch one day was Rainbow Fruit Kabobs! This idea was one I found on Pinterest. I used different fruits than what was suggested, just because it was what I already had in my fridge plus when I went to the store for more I opted out of spending so much for blueberries! My kids don't really eat them anyway. The fruits I did use were: Strawberries; Oranges; Pineapple; Kiwi; and Blackberries. I used plastic kids' chopsticks as my sticks. My daughter loved these!


Another rainbow side dish we made was Rainbow Veggies which I served at dinner one day. This was also an idea from Pinterest. I used slices of red, orange, yellow, and green peppers for the rainbow, and cauliflower for the clouds. I also added on a "pot of gold".... ranch dressing that I dyed gold with orange food coloring! This was the first time my daughter ate ALL her peppers so this recipe will definitely hit my table again some time!


Finally, two different desserts we made this week both looked like clouds! One was Cloudy Day Jell-O. I served squares of Jell-O with puffs of whipped cream throughout to look like clouds. To get this awesome sky blue color I used COTTON CANDY flavored gelatin! It was so yummy!! I found it at Wal-Mart and had never heard of the brand Kid's Kitchen before but it was totally worth it and delicious!


A second dessert this week was my Blue Sky Float! I used vanilla ice cream in clear glasses. Meanwhile, I dyed some clear lemon-lime soda blue with food coloring. I used 5 drops to get the deep blue color I wanted. When that was poured into the glasses with vanilla ice cream it turned a little lighter and the ice cream looked like clouds! Another hit with my kids and so simple!

Tuesday, May 27, 2014

Childrens Books and Movies for a Weather Theme

Summer Vacation is here and MOMS Camp 2014 has begun! MOMS Camp is something I came up with several years ago to make the most of my time with my kids during the summer. It stands for Make Our Moments Special. I've given each week over the summer a different theme.  Throughout each week we'll explore that theme with activities, crafts, movies, books, and outings. 

First off we have "Weather Week!"... complete with sunshine, clouds, rain, wind, storms, tornadoes, and ending with rainbows! We are focusing on the weather that we will be experiencing this time of year here in Kansas. This is the one time ALL SUMMER I'll be happy to see thunderstorms in the forecast! haha!


A list of books we will read this week are:

Cloudy With a Chance of Meatballs by Judi Barrett
Freddy The Frogcaster by Janice Dean
Clouds by Marion Dane Bauer
Little Cloud by Eric Carle
The Police Cloud by Christoph Niemann
In Like a Lion Out Like a Lamb by Marion Dane Bauer
Molly and the Storm by Christine Leeson
Stormy Weather by Debi Gliori
Extreme Weather: Tornadoes by Anne Wendorff
Over the Rainbow by Eric Puybaret
A Fairy Ballet by Daisy Meadows
Rainbow Magic: The Weather Fairies Set by  Daisy Meadows
Elmer and the Rainbow by David McKee


DVD's I've checked out from the library for this week include:

Sid the Science Kid: Weather Kid Sid
Sid the Science Kid: What is a Rainbow?
Elmos's World: The Great Outdoors (includes an episode called Weather)
Sesame Street: Elmo's Rainbow and Other Spring Stories
Dora the Explorer: Shy Rainbow
Cloudy With A Chance of Meatballs (1 and 2!)
The Wizard of Oz


Friday, February 7, 2014

Hand Print Snowflake Project


I love making little projects with my kids' hand prints. It is such a fun way to remember how small their sweet hands are at this age! We got pretty crafty during a recent snow day home from school so I took the opportunity to make a project with some hand print snowflakes!


As always, I used Kids Washable Crayola Paint. I painted a mix of light and dark blue on one of their hands and made the prints on white construction paper. To make the snowflake, you'll need to do multiple prints, each a little off center from the one before. We did 6-8 prints for each snowflake. Reapply the paint after every two hand prints so it doesn't get too used up.

Before the paint was dry, I had my kids sprinkle glitter (yay!) on their snowflake. This kind of paint dries very quickly so you need to move fast. We used white glitter.

 Meanwhile, I created a sign for our snowflakes on a sheet of 6x12 bright blue card stock. I used a silver metallic permanent marker to write "Our Little Snowflakes" and then added the year.


Once the snowflakes were dry, I cut them out and used a hold punch to add a hole at the top of each, as well as a hole for each on my sign. I used varying lengths of white yarn to attach my snowflakes to the sign. Here's how I made it look nice without any knots:

I threaded the yarn through as a loop into the snowflake hole.


Then I passed the two open ends of yarn through that loop and pulled tight. If your hole breaks, just reinforce it with clear tape and punch another hole through that.


Next I threaded both loose ends of my yarn UP through the hole in my sign. Wrap your two loose ends around the yarn connecting to the snowflake and tie a knot behind that.


Use tape to secure the knot to the back of your sign and pull tight.


This is such a cute decorate to have in my kitchen now - and it is one to save and pull out again each winter! I made one with my friend's children as a fun gift for her and we used blue paper as a background for our white and light blue painted hand prints.


Wednesday, February 5, 2014

Snow Day Fun - Indoor Carnival!

Being stuck inside on a snow day is no excuse for boredom! I decided to transform my whole house into an indoor carnival when my two kids were home from school on a very cold snow day. Each room had a couple different games in it and I acted as their ring master to guide them from game to game. As my kids watched tv, I set it all up and had it ready to play, but then my kids had a fun time coming up with their own games! My daughter even set up a prize stand in her room, assigning points to each item so it was a great bit of math practice when it was time to cash in our prizes!

Here are a few of the games I came up with:


I used Washable Crayola markers to draw a huge target on our living room windows and had the kids shoot their dart guns at it.


We bounced plastic buttons into a display of plastic trays... from the Dollar Spot at Target! Score!


Just timing each other while we did a simple puzzle was really fun.


Here's my favorite one: a water shooting gallery!! I drew several circles across the back of my bathtub using Washable Crayola markers. Then the kids stood next to the tub and shot at the dots with water guns! The only thing to get wet was my bathtub, and as they kept shooting, the colored dots disappeared! We actually re-did this game a few times because it was such a big hit!


Here's a giant ring toss consisting of a hula hoop and a skinny little shelf I had in our family room.  You just need something sturdy enough that it won't fall over when the ring hits it! Even a person sitting down will work - we did it that way too. ;O)


We tossed a small basketball into a large basket in our hallway...


... and I set up a bean bag toss using a few bowls from our kitchen. Check out a Valentine's Day version I made HERE that shows how to make homemade bean bags!


We did have a few other simple games, and then my kids' games they made up got a little silly, but it was definitely a fun and different way to spend some time at home on a snow day! Plus we got prizes! Have fun!