Our Blast Off! week of MOMS Camp was a big hit! I was so happy that my 4-year old really got into it! Here's some of the fun space themed recipes we had this week:
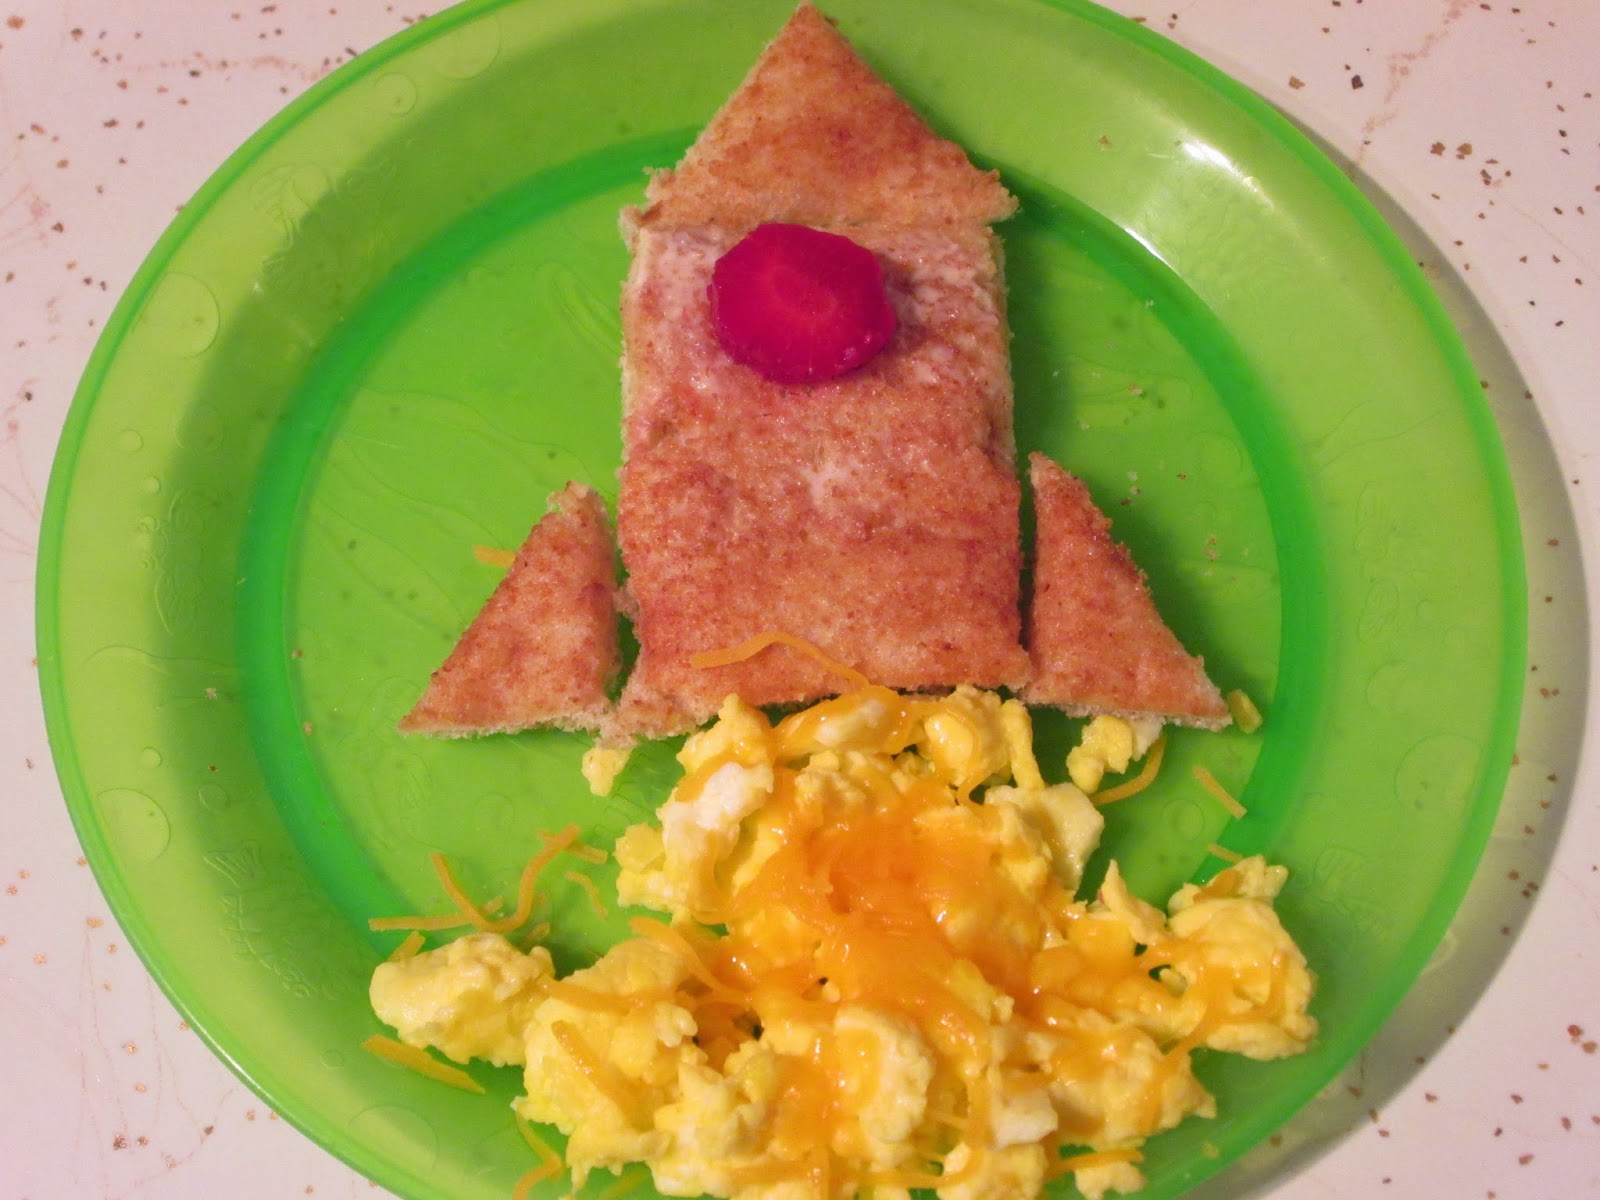
We made a fun breakfast out of toast and scrambled eggs that looked like a rocket ship! I added a bit of yellow food coloring to the eggs to make them extra bright and sprinkled some shredded cheddar cheese on them. Please note: there are no crusts on the toast! lol I also added a small window to our rocket ships using a round slice of strawberry!
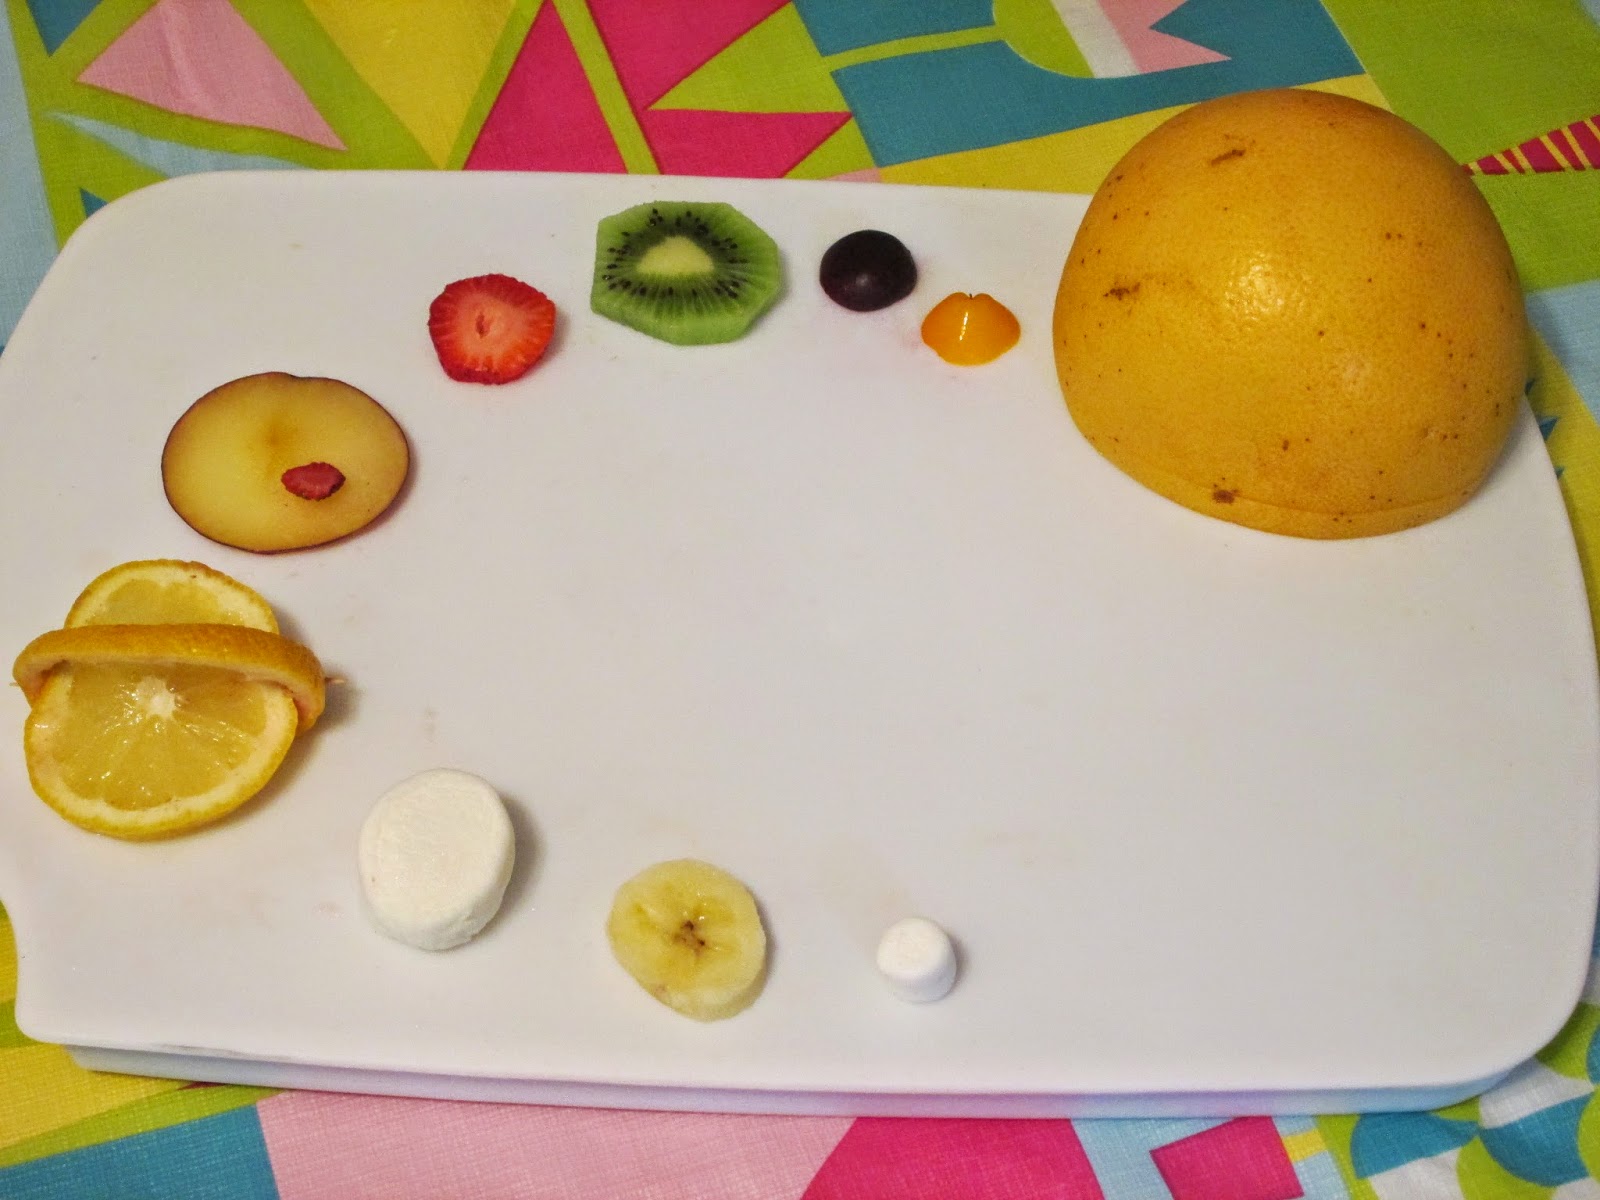
For a fun and educational snack, we shared a Fruit Tray Solar System! I found this idea on Pinterest but ended up using my own ideas for each planet, based on what I had on hand. Here's a list of what I used to get the (relatively) right colors and sizes: Sun - grapefruit; Mercury - little yellow sweet pepper; Venus - cherry; Earth - kiwi; Mars - strawberry; Jupiter - plum with a tiny strawberry to be the big red spot; Saturn - lemon with an extra lemon peel for the rings; Uranus - regular size marshmallow; Neptune - banana; Pluto - miniature marshmallow! I placed everything on my icy tray from Pampered Chef so they stayed cool...and my kids thought this snack was really "cool!"
Another very educational snack we had was a plate of Oreo cookies - portraying the Phases of the Moon!! I saw this idea on Pinterest and HAD to do it. So yummy and so smart! We also read a book about the moon and it's phases right before we had this snack. I was so proud a few nights later when my 4-year old pointed out the "half moon" in the sky! I just used a butter knife to scrape off the extra frosting we didn't need for each shape... but it was all reused in the remaining "top cookies" to create extra Oreos to eat.
A very quick and easy dessert I made one day was Night Sky Chocolate Pudding! I literally made this in a couple minutes while my kids were playing and they hardly noticed I was gone, it went so fast. This is also a great recipe your kids can make on their own! Make some instant chocolate pudding and as it is setting, sprinkle some mini marshmallows on top to be the stars. Use a sharp knife or kitchen shears to cut out a crescent shape from a regular size marshmallow to be a moon! I like making single servings ahead of time so after dinner it is so fast and easy to pull these out of the refrigerator for a yummy and special dessert.
One day this week we went to pick strawberries (not space related but fun!) so naturally I made strawberry shortcake! I did make it with a star theme to go with our space week, butt then I turned it into a red white and blue dessert so I wrote about separately for the 4th of July and you read that blog post HERE.
Showing posts with label educational. Show all posts
Wednesday, June 11, 2014
Tuesday, June 3, 2014
Fun Weather Crafts for Kids
During our Weather Week of MOMS Camp we made several fun crafts!
Part of our week was all about clouds - learning the different types and reading books about them. My personal favorite is Little Cloud by Eric Carle, in which a single cloud changes into several different shapes, like a rabbit, a shark, and a clown! After reading this book we used white paint and cotton balls to paint our own cloud shapes. Naturally my daughter made hers into a lamb! We also added lots of white paint to the middle of a sheet of construction paper, then folded it in half to make a new blob shape for a cloud. We used my favorite paint, Crayola Washable Kids Paint.
My daughter loved painting with cotton balls so much, she came up with her own project! It started when she wanted to use her favorite color (brown) to paint with... and it turned into a tornado! Later, when the paint was dry, she added lots of stickers to portray animals and bugs that might be swept up in the tornado! This project was so much fun to do!
Another fun project was finger painting with sun block! I squirted a little bit of sun block onto a plastic lid and we used our fingers to paint with it on black construction paper. You can use any dark color of paper. Be sure the sun block is kind of thick as you're painting. Then you leave it out in the sun for a couple hours and watch how the sun fades the paper's color all around your design! The sun block will evaporate and your design will be left on the paper in the original dark color! This is a fun way to teach your kids how sun block really does protect your skin!
At the beginning of the week, we made a homemade rain gauge! This was in idea from Pinterest. You'll need an empty plastic bottle, all washed out with the label taken off. Cut off the top part and turn it upside down, then place it inside to keep water from evaporating out later. I used an old steak knife to cut our bottle, and covered the rough edges with duct tape. Use a ruler to mark your measurements on one side, then you can decorate your bottle with permanent markers! We left our rain gauge outside all week, with a chance of rain every day... but it barely rained at all! My daughter (age 7) still had fun going out to check it each day though. Here's a picture of the one we saw online:
Here's ours as we made it:
Part of our week was all about clouds - learning the different types and reading books about them. My personal favorite is Little Cloud by Eric Carle, in which a single cloud changes into several different shapes, like a rabbit, a shark, and a clown! After reading this book we used white paint and cotton balls to paint our own cloud shapes. Naturally my daughter made hers into a lamb! We also added lots of white paint to the middle of a sheet of construction paper, then folded it in half to make a new blob shape for a cloud. We used my favorite paint, Crayola Washable Kids Paint.
My daughter loved painting with cotton balls so much, she came up with her own project! It started when she wanted to use her favorite color (brown) to paint with... and it turned into a tornado! Later, when the paint was dry, she added lots of stickers to portray animals and bugs that might be swept up in the tornado! This project was so much fun to do!
At the beginning of the week, we made a homemade rain gauge! This was in idea from Pinterest. You'll need an empty plastic bottle, all washed out with the label taken off. Cut off the top part and turn it upside down, then place it inside to keep water from evaporating out later. I used an old steak knife to cut our bottle, and covered the rough edges with duct tape. Use a ruler to mark your measurements on one side, then you can decorate your bottle with permanent markers! We left our rain gauge outside all week, with a chance of rain every day... but it barely rained at all! My daughter (age 7) still had fun going out to check it each day though. Here's a picture of the one we saw online:
Here's ours as we made it:
Labels:
craft,
educational,
paint,
paper,
paper plates,
recycled,
summer,
weather
Friday, September 20, 2013
9 Fun Ways To Practice Spelling Words
My daughter is in the first grade this year and already has a weekly spelling test! I can't believe how difficult the words have gotten after just a couple of weeks! We try to practice the words daily, but simply having her write them down is pretty boring. Here are several fun ideas I came up with to help her practice. Now my daughter feels like she's actually having fun and playing when she's really studying! I'm so proud to report she hasn't scored lower than 100% on a spelling test yet!
1. Glitter!
I filled a flat, rectangular plastic container with glitter and let my daughter write her letters in it. Glitter is so much prettier than sand and you can choose any color! It only took a couple ounces of glitter to fill the bottom - you don't need very much. We use the bottom tip of a permanent marker as our writing utensil.
3. Painting With Water!
We used our Aquadoodle mat to paint out her spelling words one day, but you can also paint with water on regular paper... or your driveway, or a concrete wall, or your garage door! Just use a regular paint brush and plain water.
4. Play Doh!
Use a set of letter cookie cutters to spell words in Play Doh. I got my letters as part of a set of 100 cookie cutter from Wal-Mart for cheap! You can create each individual word, or make lots of letters and use them to spell words on a separate sheet of paper.
5. Make A Spelling "Puzzle"!
I love these little foam puzzles and so do my kids! You can buy them at the Dollar Tree for...what else? A dollar. They come in a set of 9 and are all interlocking. My kids love to build shapes and roads with them. NOW we spell words with them, too! Use a permanent marker to write letters on the backs. I made lower case letters this time and added an underline to avoid confusion.
6. Spell With Sticks!
Write letters on the end of craft sticks and have your child use them to spell out words. We tuck our sticks into our count down calendar because it has great pockets. You can also just lay your sticks out on the table, or poke them into another pocket such as an apron. OR stick them into a clump of Play Doh so they'll stick up!
7. Find The Letter!
Here is a chart I made out of a 12" x 12" sheet of card stock. Write the whole alphabet on it, in large letters. Now cut off the end of a toilet paper or paper towel tube. Have your child use this to circle each letter in the word they're spelling! This feels a little reminiscent of a Ouija Board, but there's nothing scary about passing that spelling test!
8. Play School!
My daughter loves to play school, especially when I'm the student and she gets to be the teacher! One tactic I use is to raise my hand and ask her how to spell a word. Of course it happens to be on her spelling list! She loves writing on her chalkboard and she really loves "teaching" me!
9. Tablet!
This last idea is so simple but I felt like a genius when I thought of it. Have your child practice writing their spelling words on a Magna Doodle type board or even a tablet. It's easy to erase when they mess up or are ready for the next word. It still feels like playing because it's not a plain piece of paper and a pencil... and you can grab it on the go without having a hard surface to write on or worry about losing a pencil in bed, on the couch, in the car... or where ever!
1. Glitter!
I filled a flat, rectangular plastic container with glitter and let my daughter write her letters in it. Glitter is so much prettier than sand and you can choose any color! It only took a couple ounces of glitter to fill the bottom - you don't need very much. We use the bottom tip of a permanent marker as our writing utensil.
2. Cup Stacking!
Get an inexpensive package of plastic cups and write large letters on them with permanent markers. I went through my daughter's weekly list of words to determine which letters I for sure need, and if I need any doubles. Now have your child stack the letters and spell their words! For added fun, let them knock down their spelling tower after each correct word. Click HERE for instructions on how to make your own bean bags!
We used our Aquadoodle mat to paint out her spelling words one day, but you can also paint with water on regular paper... or your driveway, or a concrete wall, or your garage door! Just use a regular paint brush and plain water.
4. Play Doh!
Use a set of letter cookie cutters to spell words in Play Doh. I got my letters as part of a set of 100 cookie cutter from Wal-Mart for cheap! You can create each individual word, or make lots of letters and use them to spell words on a separate sheet of paper.
5. Make A Spelling "Puzzle"!
I love these little foam puzzles and so do my kids! You can buy them at the Dollar Tree for...what else? A dollar. They come in a set of 9 and are all interlocking. My kids love to build shapes and roads with them. NOW we spell words with them, too! Use a permanent marker to write letters on the backs. I made lower case letters this time and added an underline to avoid confusion.
6. Spell With Sticks!
Write letters on the end of craft sticks and have your child use them to spell out words. We tuck our sticks into our count down calendar because it has great pockets. You can also just lay your sticks out on the table, or poke them into another pocket such as an apron. OR stick them into a clump of Play Doh so they'll stick up!
7. Find The Letter!
Here is a chart I made out of a 12" x 12" sheet of card stock. Write the whole alphabet on it, in large letters. Now cut off the end of a toilet paper or paper towel tube. Have your child use this to circle each letter in the word they're spelling! This feels a little reminiscent of a Ouija Board, but there's nothing scary about passing that spelling test!
8. Play School!
My daughter loves to play school, especially when I'm the student and she gets to be the teacher! One tactic I use is to raise my hand and ask her how to spell a word. Of course it happens to be on her spelling list! She loves writing on her chalkboard and she really loves "teaching" me!
9. Tablet!
This last idea is so simple but I felt like a genius when I thought of it. Have your child practice writing their spelling words on a Magna Doodle type board or even a tablet. It's easy to erase when they mess up or are ready for the next word. It still feels like playing because it's not a plain piece of paper and a pencil... and you can grab it on the go without having a hard surface to write on or worry about losing a pencil in bed, on the couch, in the car... or where ever!
Monday, July 15, 2013
Cave Drawings
One of our favorite parts of Cave Week was learning about cave drawings!! We read a cute book about "Grunt! The Primitive Cave Boy" by Timothy Bush. In it a boy draws animals on his cave walls and they come to life. Then we decided to create our own cave drawings!
I used two huge sheets of brown packing paper to tape on our own "cave" walls (a corner in the living room we covered with blankets). I had been saving that packing paper for months! It originally came in a package I'd ordered from Amazon and I knew it would come in handy!
We decorated our cave walls using crayons. Each of us got to do a different section. To find some real examples of cave drawings we could replicate, we took to the internet to find pictures of real examples of cave paintings. Here are the links to the ones we really liked:
One
Two
Three
This was such a fun project because it involved learning, a creative project, and imaginative play! Molly (6) loved finding real examples of cave drawings and discussing what each image stood for or what story it would tell. As for the actual drawing part? My kids ventured in their cave to keep adding to it all week! Finally, both of them had a blast pretending to be cave men.... or even explorers discovering the drawings we'd done and speculating about the cave men who lived there. Weeks later our cave drawings are still up!
Saturday, June 8, 2013
Robot Crafts and Printables
Here are few projects we did over the past few days for our robot themed week! I found all of these simple printouts on Pinterest.
We loved this robot helicopter! I printed one out for each of my kids (plus myself) to color with markers. After you cut it out and fold the legs in opposite directions, it's supposed to twirl down like a helicopter when you drop it. Ours didn't work as well as hoped, but when you weight down the head by adding two strips of scotch tape, it works much better!
We decorated a cute robot key chain! We found ours sold individually at Michael's for less than a dollar apiece but I couldn't find a link for those online. The key chains in the link look the exact same, though! My 6 year old and I decorated ours with permanent markers. Mine had a cubed head so I drew a different facial expression on each side. This was great for emotion recognition practice for my three year old!
Here's a fun robot coloring page.
Here's another.
These pages are educational and fun! Here's a cute robot activity.
Here's another.
Hope this keeps you busy for a while!!
Wednesday, October 31, 2012
Paper Ghost Crafts, Great for Cutting Practice!
My daughter, Molly (5), is in kindergarten and cutting with scissors is important to practice, so I came up with several fun Halloween crafts for her to make! Now we have new ghost decorations for our house and Molly got to practice cutting without realizing it was like homework!
The easiest ghosts she made each started with a single sheet of white construction paper. I drew a simple ghost on it, going all the way down to the bottom edge of the paper and added in several lines for her to cut. One ghost had zig-zag lines and the other had curvy lines. Molly had to cut out each ghost and cut on the different lines as her practice. Then she got to decorate her ghosts with markers to make the faces. I loved her creepy grin with all the teeth!!
Another simple ghost project I had her make used strips of white construction paper and - my favorite - a paper plate! First I drew several lines along a sheet of white construction paper for Molly to cut out. Then I had her decorate the paper plate with a ghostly face. Finally we taped the strips to the back of the paper plate to complete her ghost!
For both ghost crafts in this blog post, use a single hole punch to create a hole at the top of each ghost's head. Thread some yarn or ribbon through and use that to hang up your newest Halloween decoration!
Labels:
crafts,
educational,
Halloween,
holiday,
paper,
paper plates
Saturday, October 13, 2012
Halloween and Fall Busy Bag Ideas
I decided to update a few items in my Busy Bag collection and wanted to add some seasonal activities for my kids! Now I have my bags separated in sets of five to be rotated out every couple weeks so there's always something new for them to play with. Here's what I've come up with so far for their Halloween and Fall Busy Bags!
Lately I've seen some really cute number games on Pinterest with a gingerbread man or a Santa theme. I decided to make a version for a Halloween/Fall Busy Bag! I used paper plates and drew a pumpkin on one and an apple on the other just to make it easy and sturdy. Then I filled the apple with smaller numbers, from 1 through 6: the numbers on one die. I filled the pumpkin with numbers you can get from rolling two dice: 2 through 12.
The object of the game is to cover all the numbers by rolling the dice and placing an object on the number as it is rolled. Use one die for the apple, and two for the pumpkin. You can cover the numbers with anything you want. I put a sandwich bag of craft pom poms in mine, but later thought some cut out shapes of pumpkin and apples SEEDS would be cute! You can play by yourself for quiet time or as a game with two or more. Molly (5) and I played by taking turns. I love that she gets practice reading the numbers while we're having fun!
Another Halloween idea I came up with for our Busy Bag collection is a set of Felt Jack-O-Lanterns! I simply cut out a pumpkin shape and several face shapes (triangles, almonds, crescents, etc) that my kids can stick on and make different expressions with. My personal favorite is the pirate eye patch! hehe I also cut out a few different shapes for stems and leaves. This is a great activity for my son, Ben (2), because he has been talking about emotions lately! "Ben is happy!" .. and at bedtime "Ben is sad." Now we can practice making a happy face, mad face, scared face, and more.
Finally, I put together a counting activity with Halloween "candy!" I cut out several pieces of candy from colorful card stock in six different colors. As usual, I used my Cricut electronic cutting machine. You could totally use real pieces of candy though, like individually wrapped hard candies or candy corn for this project! I made several cards to go along with this project, including ones with a number on them to count out the shapes and many different pattern cards. I also included a few simple math equations (1+2=3) and a couple charts for counting out the totals. I allowed for charting by color and shape and also a separate sheet for charting both (not pictured... it's on the back of one of those bottom cards).
Labels:
activities,
busy bags,
educational,
games,
paper plates
Wednesday, September 26, 2012
Busy Bag Ideas - Counting, Habitats, and Colors
Busy Bags are still going strong in my house!! Molly (5) loves to pick one out to play with during quiet time, or as a part of when we play school. Ben (2) enjoys most of them and at his age, just taking all the pieces out of the bag is fun too!
Here is a popular bag I came up with using some small plastic animals we already had and some strips of card stock. Make squares to place the animals on, labeled with numbers to practice counting. Ben is really getting into counting right now (he can count to 11 already!!) so this is a great activity for him. Meanwhile, Molly needs to work on writing and recognizing her numbers so it's important for her to practice while looking at them written down. I also included some easy math problems, which can be added to and upgraded as my kids get older.
I also included three pieces of card stock with habitats on them so my kids can sort the animals by where they live. This is Molly's favorite part. I only used animals we already had, so that limited my habitats, but if I bought more animals we could also use a Farm or Pet Store for example. Once your child gets older, you could use this idea with more specific habitats (fresh water stream, lake, desert, rainforest, savannah, etc).
Another really popular activity I found on Pinterest that my kids love is a simple color-sorting activity. I found some great plastic gems at a dollar store in four different colors - a buck per package. Then I cut out four rectangles of felt in matching colors. Ben does a really good job sorting these gems - it is such good practice for him! Any craft gem or stone or small toy will work... you just need several of each color!
Tuesday, September 25, 2012
Fun Game to Practice Sight Words
My little kindergartner has homework every night! It's easy enough and the perfect amount for her, so I'm definitely not complaining! In fact, her homework time has turned into special bonding time for us each day! She'll sit at the kitchen table working while I sit with her and do my own work (paying bills, making grocery lists, planning activities, etc). She also loves to play school while we do it so I get to be her teacher! Oh, how I love this because I played school ALL-THE-TIME when I was little.
We have working time, coloring time, reading time, recess, and today I found a way to incorporate P.E. into our homework studies! She has a list of sight words to practice each week (the, in, is...) Today I wrote them each on a paper plate. Then we took them into the living room to start our gym class:
Spread the paper plates out on the floor. As you set each one down, be sure to show them to your child and use the word so they know what it is. Once all the plates are down, call out a sight word and have them stand on it as fast as they can when they find the correct one. They can run to it or jump on it or dance around them. Your child will never know they're learning at the same time! Keep calling out the words so your child can find them quickly and stand on them.
Here are some more variations:
* Use the sight word in a sentence instead of just saying it and have your child hurry to stand on that word.
* Just say the word, but then have your child use it in a sentence once they stand on it.
* Play music like musical chairs and when it stops have your child stand on the nearest word and read it aloud.
* Use the paper plates like giant flash cards.
Wednesday, September 5, 2012
Clothes Pin Cards for Busy Bags
Busy Bags are a great way to keep your kids busy for a few minutes with some quality quiet play time. However, MAKING those Busy Bags with your kids in the first place is another great activity for them to do! I feel weird having all the fun creating these Busy Bags for my kids, so I wanted to make one that they could get involved in too.
When I first came across these different clothes pin cards, I thought they were a great idea! This blog has two different ones: Second Story Window. The ones we made are basically the same, except we used one of my favorite craft supplies: paper plates! When making these Busy Bags, you'll also need plenty of clothes pins. I found mine at the Dollar Tree: a pack of 36 for a dollar!
Now, start by dividing your plates into "pie slices". I chose nine colors for the first one, so I used a straight edge to create nine sections, just by eye-balling it. Draw a blob of color in each section, to look like a paint palette. Now color the tip of nine clothes pins in those same colors.
Ben (2) will use the colored side to make his matches. Molly (5), will match hers using the other side, where I wrote the words out for each color. For now I wrote them in their corresponding color, but down the road you can write them all in black so your child truly has to read the word.
The second plate needed 10 slices, for the numbers 1 through 10. I also wrote the numbers 1 through 10 on the tip of clothes pins, and added that amount of dots on the other side of each clothes pin. To fill in the sections of our plate, I had Molly count out stickers to place in each one. After she got tired of that tedious task, I took over and had fun building shapes with them. :O)
Finally we made a plate with 26 slices for the alphabet. If you're using a ribbed paper plate like I did, each slice should be allotted about 2.5 ribs each. You can still use a straight edge, though. All along the edge, I wrote capital letters of the alphabet. I also rewrote them closer to the middle so they would still show up with a clothes pin hooked on. The clothes pins, on the other hand, had a lower case letter on each one. The object is to match the big letter with it's small one!
To store all these pieces in a Busy Bag, I kept each set of clothes pins separate in their own sandwich size bag. Now let's hope my kids stick to the Busy Bag rule: only one bag open at a time, and everything goes back in before you open the next one!
Subscribe to:
Comments (Atom)